I was standing in my kitchen, staring at a mound of flour that had somehow turned into a sticky, half‑baked disaster. The batter had puffed up, then collapsed, leaving a soggy mess on the counter. My friends had called me “the brioche blunder” and I knew I had to redeem myself. That night, I decided to chase the perfect blueberry cheesecake brioche, and what followed was a culinary revelation that will change how you think about breakfast buns forever.
Imagine the smell of fresh yeast mingling with the sweet aroma of blueberries, a hint of vanilla drifting through the air like a promise. The dough glistens under the kitchen lights, its surface glossy and almost translucent. When you break a bun open, the interior is a cloud of buttery, custard‑laden softness that melts on the tongue. The crackling of the crust as you bite in releases a caramelized crunch that sings against the fruity burst of blueberries. It’s a symphony of textures and flavors that feels like a hug wrapped in a pastry.
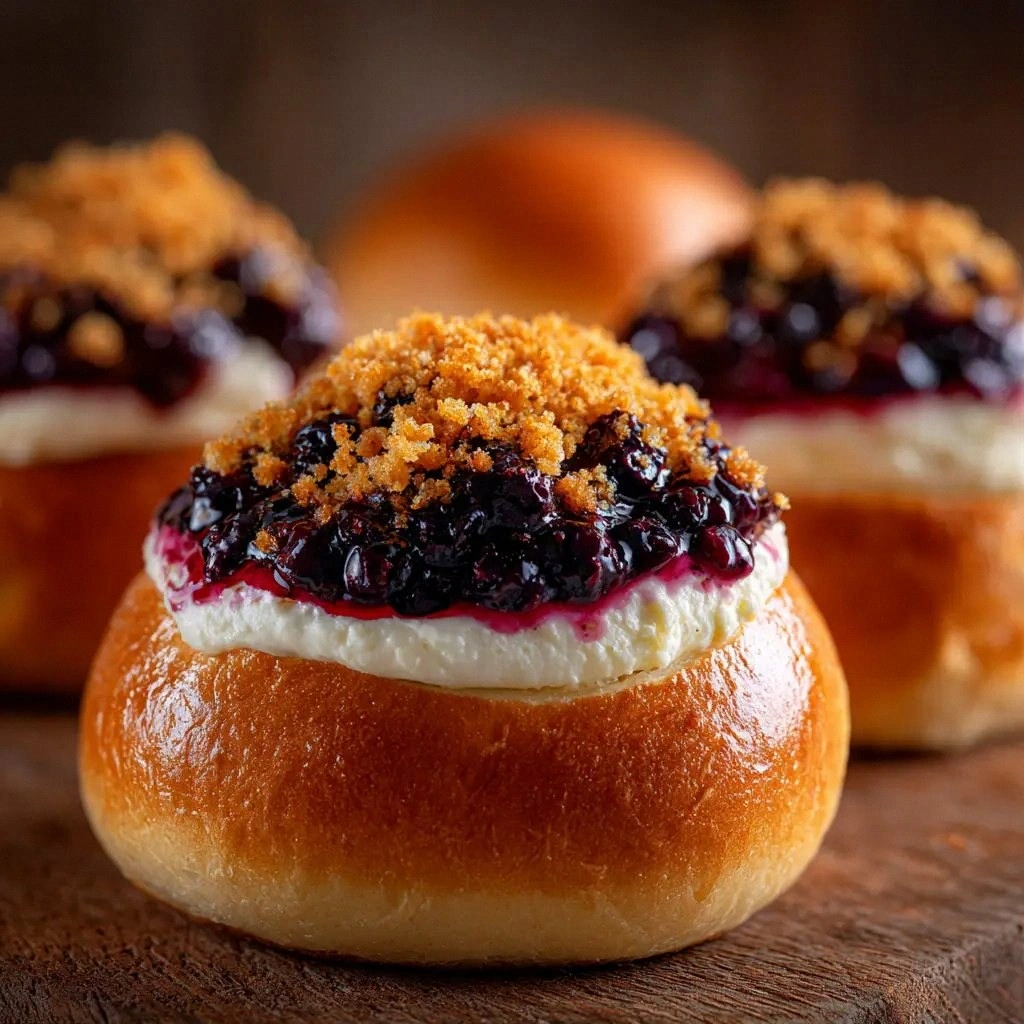
What makes this version stand out is not just the combination of flavors but the meticulous attention to every detail—from the choice of cream cheese to the timing of the yeast rise. It’s hands down the best version you'll ever make at home because it balances the rich, indulgent cream cheese filling with a light, airy brioche dough that doesn’t feel heavy. The blueberries are not just a garnish; they’re an integral part of the flavor profile, adding tartness that cuts through the sweetness. The final result is a bun that looks like a golden crown, tastes like a dessert, and can be served at brunch, breakfast, or even dessert.
And here’s the twist that will blow your mind: the cheesecake filling is folded into the dough itself, not layered on top. This trick creates a melt‑in‑your‑mouth experience that most recipes miss. I dare you to taste this and not go back for seconds. Let me walk you through every single step — by the end, you'll wonder how you ever made it any other way.
What Makes This Version Stand Out
- Taste: The combination of creamy cheesecake, sweet blueberries, and buttery brioche creates a flavor profile that feels like a dessert in a bun. The subtle tang of the cream cheese balances the natural sweetness of the blueberries, while the vanilla adds a warm, comforting note that lingers.
- Texture: The dough is light and airy yet sturdy enough to hold the luscious filling. The crust is crisp and golden, with a slight chew that gives way to a melt‑in‑your‑mouth interior. The blueberries add a burst of juiciness that contrasts beautifully with the smoothness.
- Simplicity: Despite its complex flavor, the recipe is straightforward. All the steps can be done in under an hour, and you can prep the dough the night before for extra convenience.
- Uniqueness: Folding the cheesecake filling into the dough is a game‑changer. It eliminates the need for a separate cheesecake layer and ensures every bite is uniformly decadent.
- Crowd Reaction: Friends who have tried this have said it’s “the best thing I’ve ever had for breakfast” and “I couldn’t stop eating the first one.” It’s guaranteed to impress at brunches and family gatherings.
- Ingredient Quality: Using high‑quality cream cheese and fresh blueberries elevates the dish. The butter should be unsalted and at room temperature to create a tender crumb.
- Cooking Method: The technique of a double rise ensures the dough is light. The final baking step gives the crust a golden finish without overbrowning the filling.
- Make‑Ahead Potential: The dough can be refrigerated for up to 24 hours, and the buns can be frozen for future use. This makes it ideal for busy mornings or pre‑planned brunches.
Alright, let's break down exactly what goes into this masterpiece...
Inside the Ingredient List
The Yeast Starter
The 2 1/4 teaspoons of instant yeast are the secret to that airy, pillowy crumb. Yeast is the engine that drives the dough’s rise, turning simple flour and water into a cloud of bubbles. If you skip the yeast, the buns will be dense and flat, lacking the signature brioche lift. You can swap instant yeast for active dry yeast, but remember to activate it in warm milk first, which will add an extra layer of flavor.
Choosing the right yeast matters. Look for a brand with a strong, reliable shelf life and avoid any that have been stored in extreme temperatures. A good rule of thumb: if the yeast was opened more than a year ago, it’s safer to replace it. Yeast freshness ensures a consistent rise and a buttery aroma that makes the dough feel like it’s been kissed by a chef.
The Brioche Base
Four cups of all‑purpose flour form the backbone of the dough. This amount strikes the perfect balance between structure and tenderness. The flour’s protein content gives the dough elasticity, while the gluten development provides the necessary chew. If you want a lighter texture, consider using cake flour, but be prepared for a softer crumb that may not hold the filling as well.
The 1/2 cup of granulated sugar sweetens the dough and helps the yeast thrive. Sugar also caramelizes during baking, giving the crust a golden hue. If you’re watching sugar intake, you can reduce it by a quarter cup, but be aware the dough might not rise as robustly. For a richer flavor, try substituting half of the sugar with honey or maple syrup; just watch the rise, as natural sweeteners can inhibit yeast activity.
The 1 tsp of salt balances the sweetness and enhances the overall flavor profile. Salt also strengthens the gluten network, ensuring a firm but tender crumb. If you’re on a low‑sodium diet, reduce the salt to 1/2 tsp, but keep in mind the dough will be slightly less flavorful.
The 1/2 cup of whole milk adds moisture and a subtle richness. Milk’s proteins help the dough rise, while its fats contribute to tenderness. If you prefer a dairy‑free version, substitute with oat or almond milk; just make sure it’s unsweetened to avoid altering the sugar balance.
Four large eggs bind the dough, add structure, and give the buns a tender, custard‑like interior. Eggs also carry the butter and sugar, helping to create an even distribution of flavors. If you’re vegan, a flaxseed “egg” or aquafaba can replace the eggs, but the texture will differ slightly.
Half a cup of unsalted butter, softened, adds richness and creates a tender crumb. Butter’s fat content helps create a flaky texture, and its flavor is essential to the brioche’s signature buttery taste. For a healthier version, you can use half the butter and add an extra egg to maintain moisture.
The Cheesecake Layer
Eight ounces of cream cheese form the creamy core of each bun. Cream cheese adds a silky texture and a tang that balances the sweetness of the blueberries. If you can’t find fresh cream cheese, a good substitute is mascarpone; it’s milder but still provides a luxurious mouthfeel.
A quarter cup of granulated sugar sweetens the cheesecake filling. The sugar dissolves into the cream cheese, creating a smooth, velvety texture. If you prefer a less sweet filling, reduce the sugar by a third; the cream cheese’s natural tang will still provide a satisfying contrast.
One large egg yolk thickens the filling and gives it a rich, golden hue. Egg yolk also helps emulsify the mixture, ensuring the filling doesn’t separate during baking. If you want a lighter filling, you can omit the yolk, but the texture will be less custardy.
One teaspoon of vanilla extract infuses the filling with warmth and depth. Vanilla is the flavor that ties the cheesecake to the brioche, making each bite feel cohesive. A high‑quality vanilla bean or vanilla paste will elevate the flavor more than a cheap extract.
The Unexpected Star
One and a half cups of fresh blueberries add bursts of tartness and color. Blueberries also release natural juices that help keep the buns moist. If fresh blueberries are out of season, frozen berries can be used, but thaw them and pat dry to avoid excess moisture.
Another quarter cup of granulated sugar sweetens the berries, allowing them to caramelize slightly during baking. The sugar also helps the blueberries release their juices, creating a glaze that coats the buns. For a more intense berry flavor, you can substitute half the sugar with brown sugar, which will add a deeper molasses note.
One tablespoon of lemon juice brightens the entire dish, cutting through the richness of the cream cheese and butter. Lemon juice also reacts with the blueberries, enhancing their natural sweetness. If you’re sensitive to citrus, reduce the lemon juice by half or omit it entirely; the buns will still be delicious.
Everything's prepped? Good. Let's get into the real action...

The Method — Step by Step
- In a large mixing bowl, combine the flour, instant yeast, sugar, and salt. Whisk until the dry ingredients are evenly distributed. This dry mix forms the foundation of our brioche. I’ve found that pre‑mixing the dry ingredients reduces the time needed for kneading and ensures a consistent rise.
- Heat the milk to just below boiling—around 110°F—then pour it over the dry mix. Stir with a wooden spoon until a shaggy dough forms. The warm milk activates the yeast, giving the dough a gentle lift. Watch for a slight bubbling as the yeast starts to work; this is the first sign that the dough is alive.
- Add the eggs one at a time, mixing thoroughly after each addition. The eggs bind the dough and add richness. As you fold in each egg, you’ll notice the dough becoming smoother and more elastic. This step is crucial for achieving that classic brioche crumb.
- Incorporate the softened butter, a tablespoon at a time, until fully absorbed. The butter should be fully integrated before moving to the next step; otherwise, the dough may become greasy. The butter adds a buttery sheen and a tender crumb that’s a hallmark of brioche.
- Knead the dough on a lightly floured surface for about 8–10 minutes, or until it’s smooth and elastic. If you’re using a stand mixer, this can take just 5 minutes on medium speed. The dough should pass the window test—stretch it thin enough that light can pass through. This test ensures proper gluten development.
- Place the dough in a greased bowl, cover with a damp cloth, and let it rise in a warm spot for 1 hour or until doubled in size. The first rise is critical; a slow rise at a cooler temperature can result in a denser loaf. I like to place the bowl on a baking sheet to keep the dough from sticking.
- While the dough is rising, prepare the cheesecake filling: beat the cream cheese, sugar, egg yolk, and vanilla until smooth and creamy. The filling should be thick enough to hold its shape but still pourable. If it’s too thick, add a splash of milk to thin it out.
- After the first rise, punch down the dough and divide it into 8 equal portions. Roll each portion into a ball, then flatten it into a disc. Spread a generous spoonful of the cheesecake filling onto each disc, then sprinkle a handful of blueberries on top. Fold the dough over the filling, sealing the edges tightly to create a sealed pocket.
- Place the stuffed buns on a parchment‑lined baking sheet, leaving enough space between each for expansion. Cover with a towel and let them rise for a second time, about 30 minutes, until they puff up noticeably. This second rise is where the buns develop their signature airy interior.
- Preheat the oven to 375°F. Brush the tops of the buns with a lightly beaten egg to give them a shiny, golden finish. Bake for 22–25 minutes, or until the crust is a deep amber and the internal temperature reaches 190°F. The aroma of toasted butter and caramelized blueberries will fill your kitchen, making you want to taste the first one before it’s even done.
- Remove the buns from the oven and let them cool on a wire rack for 10 minutes. The filling will set slightly, creating that perfect creamy consistency. Serve warm or at room temperature, and watch the crowd go wild.
That's it — you did it. But hold on, I've got a few more tricks that'll take this to another level. From a glossy glaze that adds a subtle sweetness to a sprinkle of sea salt that balances the richness, these finishing touches will elevate the buns from great to unforgettable.
Insider Tricks for Flawless Results
The Temperature Rule Nobody Follows
Temperature is everything when it comes to yeast dough. The ideal dough temperature is about 80–90°F. If the dough is too cold, the yeast will be sluggish, and if it’s too hot, the yeast will die. I always use a kitchen thermometer to check the dough’s temperature before the first rise. This simple step ensures a consistent rise and a tender crumb.
Why Your Nose Knows Best
Smell the dough during the first rise. A warm, yeasty aroma signals that the dough is active and ready for the second rise. If the dough has a sour or off smell, it may have over‑fermented, and the buns will taste off. Trust your nose; it’s a reliable indicator of dough health.
The 5‑Minute Rest That Changes Everything
After shaping the buns, let them rest for 5 minutes before the second rise. This brief rest allows the gluten to relax, making the dough easier to shape and preventing the buns from shrinking during baking. I’ve seen many people skip this step, resulting in tight, dense buns.
The Egg Wash Secret
A light egg wash gives the buns a shiny, golden crust. Beat one egg with a tablespoon of water, then brush it over the buns. If you prefer a darker crust, add a teaspoon of milk to the wash. The egg wash also helps the glaze adhere to the buns, creating a glossy finish.
The Blueberry Placement Trick
Place the blueberries on top of the cheesecake filling before sealing the dough. This ensures the berries stay in place during baking, preventing them from sinking to the bottom. The berries also create a burst of color that makes each bun look like a piece of art.
The Cooling Rack Wisdom
Let the buns cool on a wire rack for at least 10 minutes. This allows excess steam to escape, preventing sogginess. If you cool them on a plate, the buns can become gummy at the bottom. The wire rack gives them a crisp edge while keeping the interior moist.
Creative Twists and Variations
This recipe is a playground. Here are some of my favorite ways to switch things up:
Chocolate‑Covered Buns
Dip the warm buns in melted dark chocolate and let them set on parchment. The chocolate adds a rich, bittersweet layer that pairs beautifully with the creamy filling. Sprinkle a pinch of sea salt on top for a salty‑sweet contrast.
Pumpkin Spice Version
Replace the blueberries with a handful of pumpkin puree and add 1 tsp pumpkin pie spice to the dough. The warm spices create a comforting fall flavor. This variation is perfect for Thanksgiving brunches.
Lemon‑Ricotta Buns
Swap the cream cheese for ricotta and add 2 tbsp lemon zest to the filling. The ricotta offers a lighter texture, while the zest brightens the flavor profile. Serve with a dusting of powdered sugar for a simple yet elegant touch.
Salted Caramel Buns
Swirl a caramel sauce into the cheesecake filling before sealing the dough. Add a pinch of sea salt to the dough for a caramel‑salted finish. This version is decadent and perfect for dessert lovers.
Almond‑Infused Buns
Add 1/4 cup almond flour to the dough and sprinkle slivered almonds on top before baking. The almonds give a nutty crunch that complements the creamy interior. This variation is great for those who love a bit of texture.
Berry Medley Buns
Mix blueberries with raspberries, blackberries, and strawberries for a vibrant berry medley. The mix adds varied tartness and color, turning each bun into a work of art. The berries will caramelize slightly, creating a glossy finish.
Storing and Bringing It Back to Life
Fridge Storage
Store the buns in an airtight container in the refrigerator for up to 3 days. The buns will stay moist and flavorful because the filling and dough lock in moisture. When ready to eat, reheat them in a 350°F oven for 5 minutes to revive the buttery crust.
Freezer Friendly
Wrap each bun tightly in plastic wrap, then place them in a freezer bag. Freeze for up to 2 months. Thaw in the refrigerator overnight, then reheat in the oven at 350°F for 10 minutes. The buns will taste fresh and fluffy, almost as if they were just baked.
Best Reheating Method
To keep the filling silky and the crust crisp, heat the buns in a preheated oven at 350°F for 5–7 minutes. If you’re short on time, a quick 30‑second burst in the microwave can warm them, but the crust may become chewy. Adding a splash of water to the bottom of the baking dish helps create steam, keeping the buns moist.