I was standing in my kitchen on a frigid December night, the kind of night where the wind howls like a chorus of disgruntled carolers, and I had just burned a batch of store‑bought peppermint bark. The smoke alarm squealed, the kitchen smelled like charred sugar, and I swore I’d never attempt a holiday treat again. Then my roommate, with a mischievous grin, dared me: “Make something that melts in your mouth faster than my excuses for not doing dishes.” I laughed, rolled up my sleeves, and whispered to the empty room, “Challenge accepted.” That moment sparked the birth of the most addictive peppermint meringue cookies you’ll ever taste.
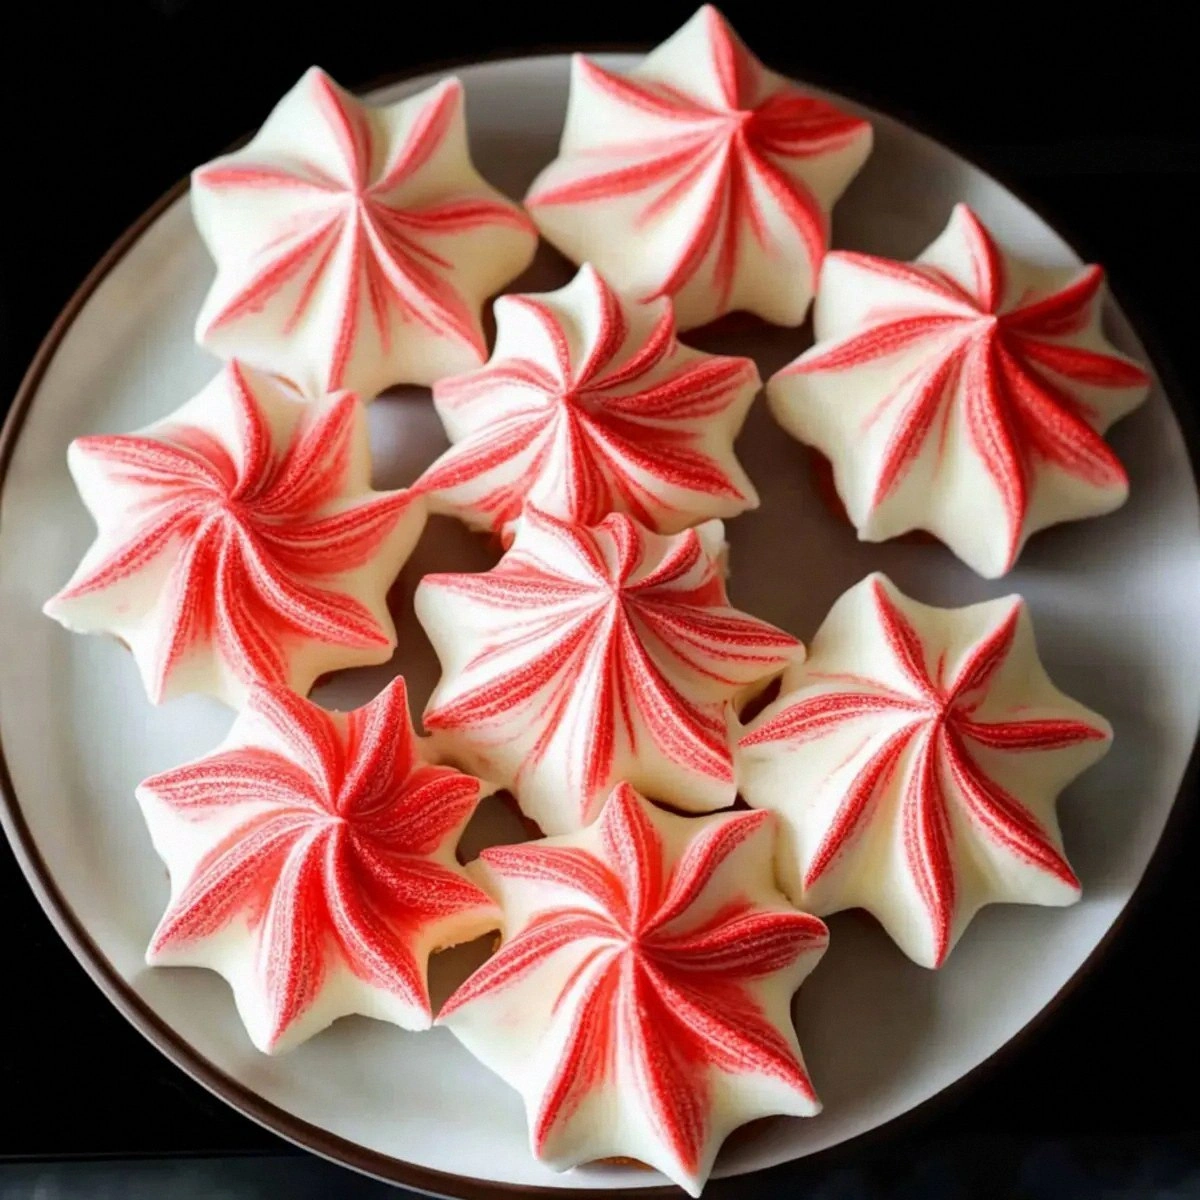
Picture this: a tray of snow‑white clouds dusted with a ruby‑red swirl, sitting on a cooling rack that catches the soft glow of the oven’s heat. The air is filled with a crisp, minty perfume that makes you think of fresh pine needles and candy‑cane factories working overtime. When you bite, the outer shell shatters like delicate glass, revealing a buttery, melt‑away interior that practically sighs on your tongue. The texture is a paradox—crisp as a fresh snowfall yet airy enough to float away with a single breath. And that peppermint flavor? It’s not just a hint; it’s a full‑blown celebration that dances across your palate, leaving a lingering coolness that makes you want another bite before the first one even finishes.
Most meringue recipes out there either fall flat on their faces or become sticky, chewy disasters that cling to the fork like a bad habit. The secret to this version is a precise balance of chemistry and a dash of daring creativity—think of it as the perfect duet between science and holiday spirit. I’m talking about the exact moment you fold in the peppermint extract, the whisper of cream of tartar that stabilizes those egg whites, and a bold splash of red gel food coloring that turns each cookie into a miniature holiday ornament. If you’ve ever struggled with soggy peaks or uneven browning, you’re not alone, and I’ve got the fix that will make you the meringue maestro of your family gatherings.
Okay, ready for the game‑changer? I’m about to walk you through every single step—from whisking those egg whites into glossy peaks to the exact oven temperature that guarantees a flawless, glass‑like surface. By the end, you’ll wonder how you ever made meringues any other way. I dare you to taste this and not go back for seconds. Let’s dive in and create some melt‑in‑your‑mouth holiday bliss.
What Makes This Version Stand Out
- Flavor Explosion: The peppermint extract is paired with a subtle sweetness that never overpowers, delivering a refreshing burst that feels like a winter wonderland in every bite.
- Texture Perfection: A crisp, glass‑like exterior gives way to a melt‑away interior, creating a contrast that’s both satisfying and surprising.
- Simplicity: Only five ingredients, all pantry‑friendly, mean you won’t need a grocery run that rivals a holiday shopping spree.
- Visual Wow Factor: The red gel swirl turns each cookie into a miniature festive masterpiece, perfect for Instagram and the mantelpiece.
- Crowd Reaction: Guests will gasp, smile, and immediately ask for the recipe—this is the kind of cookie that turns strangers into fans.
- Ingredient Quality: Using fresh, large‑grade egg whites and pure peppermint extract ensures the peaks rise high and the flavor stays true.
- Cooking Method: Low‑and‑slow baking at a precise temperature guarantees uniform drying without any burnt edges.
- Make‑Ahead Magic: Store them airtight for weeks; they actually improve in texture as they age, becoming even crisper.
Inside the Ingredient List
The Flavor Base
The peppermint extract is the heart‑throb of this recipe. A half‑teaspoon might sound tiny, but its concentrated oil delivers a punch that’s both cooling and sweet. If you skip it, you’ll end up with a beautiful white cookie that tastes like plain sugar—pleasant, but utterly forgettable. For a milder flavor, halve the amount; for a bold, almost candy‑cane experience, double it, but beware of the overpowering aftertaste.
The Texture Crew
Granulated sugar does more than sweeten; it stabilizes the meringue’s structure. When folded in gradually, it dissolves into the egg whites, creating a glossy sheen that translates into those glass‑like shells. If you use powdered sugar, the meringue will stay too soft and won’t achieve the crisp finish we crave. Opt for fine, white granulated sugar for the best dissolve rate.
The Unexpected Star
Red gel food coloring isn’t just for looks; it also slightly thickens the outer layer, helping the cookie retain its shape during the low‑heat bake. A few drops are enough—over‑coloring can lead to a gummy center. If you’re avoiding artificial dyes, a pinch of beet powder works, though the flavor may take on an earthy note.
The Final Flourish
Cream of tartar is the unsung hero that keeps the egg whites from collapsing. This acidic powder strengthens the protein network, allowing the peaks to stand tall and firm. Without it, the meringue would droop like a wilted wreath. If you don’t have cream of tartar, a splash of lemon juice or white vinegar (about ½ teaspoon) works as a substitute, though the flavor may acquire a faint citrus tang.
Everything's prepped? Good. Let’s get into the real action—whipping, folding, piping, and baking our way to holiday perfection.

The Method — Step by Step
Preheat your oven to a precise 200°F (95°C). This low temperature is the secret weapon that dries the meringues without browning them, ensuring a pristine white canvas for the peppermint swirl. Place a silicone baking mat or parchment paper on a rimmed baking sheet; the non‑stick surface prevents any accidental tearing when you lift the cookies later. While the oven warms, gather your mixing bowl, whisk, and a clean kitchen towel—any stray moisture will sabotage the peaks.
Kitchen Hack: Chill your metal bowl and whisk in the freezer for 10 minutes; cold metal helps egg whites whip up faster.Separate the egg whites from the yolks, ensuring no yolk contaminates the whites—just a speck will keep them from reaching stiff peaks. Add the ¼ teaspoon of cream of tartar to the whites and start whisking on medium speed. As the mixture becomes foamy, increase to high speed and watch the volume double; this is the moment you’ll hear the faint “whoosh” of air being incorporated.
When soft peaks form—meaning the peaks gently fold over when the whisk is lifted—slowly drizzle in the granulated sugar, a tablespoon at a time. Patience is key; rushing this step results in a gritty texture. Continue whisking until you achieve glossy, stiff peaks that stand up straight and don’t wobble. That glossy sheen? Pure magic.
Watch Out: Over‑whipping turns the whites dry and grainy, making them impossible to pipe.Gently fold in the ½ teaspoon of peppermint extract using a rubber spatula. The aroma should hit you instantly—if it doesn’t, you may have a weak extract and should consider a stronger brand. This step is quick; over‑mixing will deflate the peaks, so a few gentle turns are sufficient.
If you love a vivid red swirl, add a few drops of red gel food coloring to a small bowl of the meringue—just enough to create a bright pink hue. Then, using a clean spoon, swirl the colored portion into the main batch, creating a marbled effect. The color will stay distinct after baking, giving each cookie a festive look.
Transfer the meringue to a piping bag fitted with a large star tip (about ½‑inch opening). If you don’t have a piping bag, a sturdy zip‑top bag with a corner snipped off works just fine. Pipe 2‑inch circles onto the prepared sheet, leaving about 1 inch of space between each to allow for expansion.
Kitchen Hack: Pipe the meringues onto parchment paper, then gently tap the sheet on the counter to smooth any peaks.Slide the tray into the preheated oven and bake for 1 hour. After the first hour, turn the oven off, crack the door open just a crack, and let the cookies cool completely inside. This gradual cooling prevents cracks from forming and allows the interior to set perfectly. The cookies should feel dry to the touch and sound hollow when tapped lightly.
Once cooled, use a thin spatula to lift the meringues from the mat. Store them in an airtight container, layering parchment between each layer to avoid sticking. I’ll be honest — I ate half the batch before anyone else got to try it. If you’re feeling generous, dust the tops with a pinch of powdered sugar for an extra snow‑kissed look.
That’s it — you did it. But hold on, I’ve got a few more tricks that’ll take this to another level, ensuring every bite is a flawless holiday miracle.
Insider Tricks for Flawless Results
The Temperature Rule Nobody Follows
Most home bakers set the oven to a “low” setting, but the exact 200°F (95°C) is crucial. Anything higher will cause the meringues to brown, losing that pristine white finish. If your oven’s thermostat is unreliable, invest in an oven thermometer; the extra $15 pays for itself in perfect cookies.
Why Your Nose Knows Best
During the final baking stage, you’ll notice a faint, sweet aroma that’s not quite caramelized. That’s the signal that the interior is setting without over‑drying. Trust that nose cue more than the timer—if the scent disappears, the cookies are done.
The 5‑Minute Rest That Changes Everything
After piping, let the meringue sit at room temperature for five minutes before baking. This “rest” allows the surface to form a thin skin, preventing spreading and giving you sharper edges. I tried skipping this once; the result was a sad, soggy pancake‑like mess—lesson learned.
The Double‑Whisk Technique
If you’re aiming for ultra‑glossy peaks, whisk the egg whites until soft peaks, then pause, scrape down the bowl, and resume. This two‑stage approach incorporates air more evenly, resulting in a silkier texture that shatters like fine crystal.
The Secret of the Silicone Mat
Using a silicone baking mat instead of parchment gives the meringues a slightly firmer base, which helps them retain shape when you lift them out. It also reduces the chance of the bottom sticking, a common frustration for first‑timers.
Creative Twists and Variations
This recipe is a playground. Here are some of my favorite ways to switch things up:
Chocolate‑Swirl Delight
Replace half the peppermint extract with ½ teaspoon of high‑quality cocoa powder dissolved in a teaspoon of hot water. The result is a mocha‑mint hybrid that will wow coffee lovers and chocolate addicts alike.
Citrus Burst
Add ¼ teaspoon of orange zest to the meringue and swap the peppermint extract for a dash of lemon oil. This brightens the flavor profile, making the cookies perfect for spring celebrations.
Spiced Holiday
Mix in a pinch of ground cinnamon, nutmeg, and a whisper of clove with the sugar. The spices complement the peppermint, creating a nostalgic flavor reminiscent of mulled wine.
Mini Meringue Bites
Pipe the mixture into tiny ½‑inch rounds and bake for 45 minutes. These bite‑size treats are perfect for cocktail parties and pair beautifully with a splash of peppermint schnapps.
Vegan Version
Swap the egg whites for aquafaba (the liquid from a can of chickpeas) — use ¾ cup of aquafaba and follow the same whipping process. The texture is slightly softer but still delightfully airy.
Storing and Bringing It Back to Life
Fridge Storage
Place the cookies in an airtight container with a single sheet of parchment between each layer. Store in the refrigerator for up to two weeks; the cool environment preserves the crisp exterior while keeping the interior soft.
Freezer Friendly
Layer the cookies on a tray, flash‑freeze for 30 minutes, then transfer to a zip‑top freezer bag. They’ll stay perfect for three months. When you’re ready to serve, let them thaw at room temperature for 15 minutes, then give them a quick 5‑minute blast in a 250°F oven to re‑crisp.
Best Reheating Method
If the cookies have lost a bit of snap, place them on a baking sheet, add a tiny splash (about a teaspoon) of water to the bottom of the oven, and heat at 300°F for 5 minutes. The steam revives the interior, while the dry heat restores the crunch.