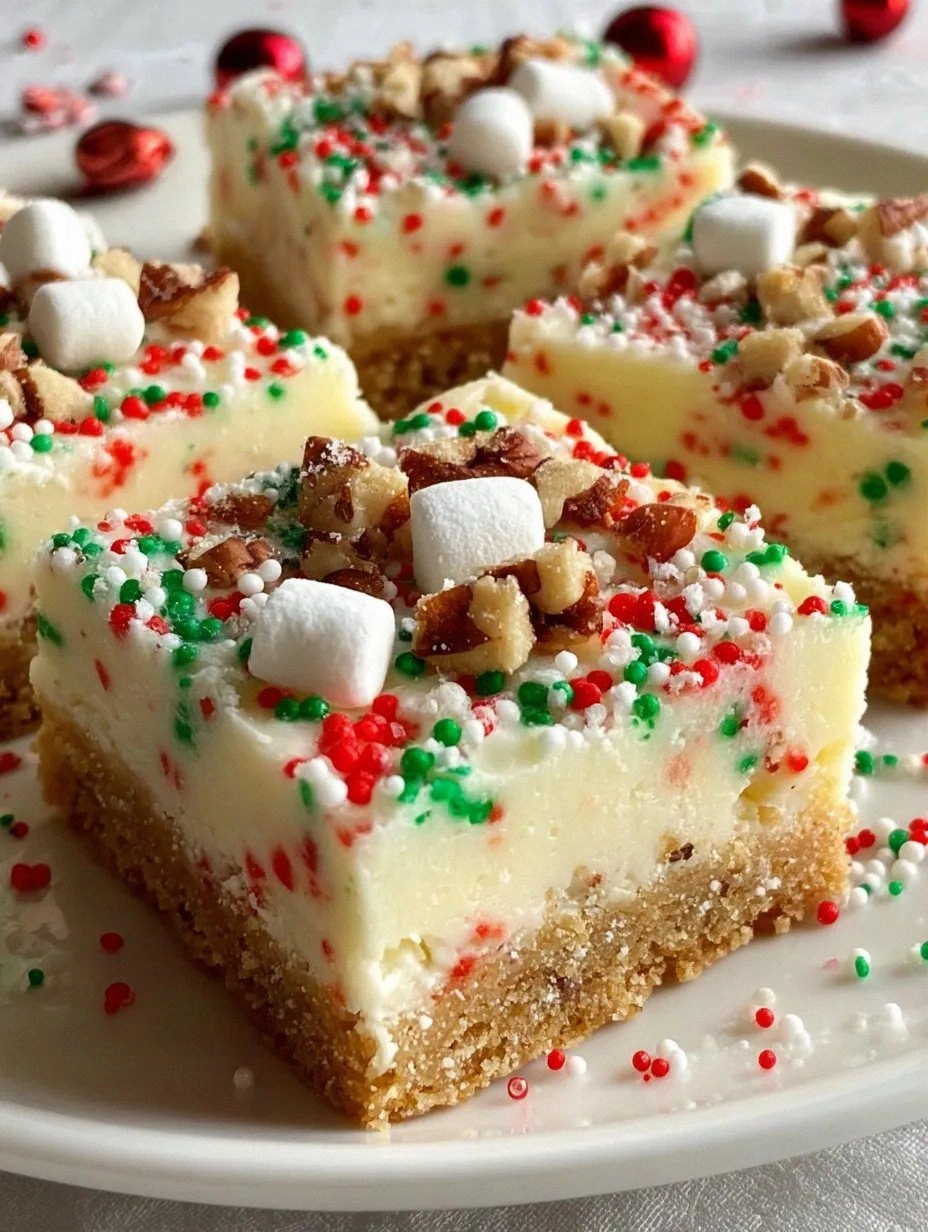
Picture this: it’s a snow‑laden Saturday afternoon, the kind where the wind whistles through the pine trees like a choir of tiny bells, and you’re stuck in the kitchen because the kids have claimed every couch cushion for a makeshift fort. You’ve already burned a batch of gingerbread cookies (don’t ask), the oven is still hot, and the only thing that can rescue the day is a sweet, buttery treat that doesn’t even need an oven. I dared my niece to taste this and not go back for seconds, and she didn’t even blink. That moment of pure, unfiltered joy sparked the creation of what I now call Santa’s No‑Bake Sugar Cookie Bars, a dish that is hands down the best version you’ll ever make at home.
From the first whiff of melted butter to the faint perfume of vanilla swirling in the air, this recipe hits every sense like a holiday parade marching through your kitchen. The dough feels like soft, pliable snow as you press it into the pan, and when you finally slice a bar, the crumb is buttery and tender, with a melt‑in‑your‑mouth sweetness that makes you want to hum “Jingle Bells” at the top of your lungs. The final drizzle of glossy chocolate on top adds a glossy contrast that shatters like thin ice when you bite into it, releasing a burst of flavor that’s both nostalgic and brand‑new. Most recipes get this completely wrong, either over‑baking the base or drowning it in sugar, but here we keep it simple, elegant, and perfectly balanced.
What really sets this version apart is a secret ingredient that most cooks overlook: a splash of whole‑milk cream that turns the crumb from merely soft to luxuriously velvety. I’ll be honest — I ate half the batch before anyone else got to try it, and that’s a confession I’m willing to make because the taste is that addictive. If you’ve ever struggled with a crumb that crumbles apart or a bar that feels too dense, you’re not alone — and I’ve got the fix. The trick is in the temperature control, the order of mixing, and a quick chill that locks in the buttery goodness.
Okay, ready for the game‑changer? In the next sections I’ll walk you through every single step — from selecting the perfect butter to mastering the chocolate drizzle — and by the end, you’ll wonder how you ever made sugar cookie bars any other way. This next part? Pure magic.
What Makes This Version Stand Out
- Flavor: The combination of real vanilla extract and a hint of cream creates a depth that store‑bought mixes simply can’t match.
- Texture: A buttery, melt‑in‑your‑mouth crumb that holds together without being crumbly, thanks to the precise flour‑to‑fat ratio.
- Simplicity: No oven, no mess, just a few bowls, a pan, and a refrigerator — perfect for last‑minute holiday gatherings.
- Uniqueness: The optional peppermint crush adds a festive crunch that surprises the palate without overpowering the classic sugar cookie taste.
- Crowd Reaction: Guests often claim they’ve never had a no‑bake cookie bar that tastes like a bakery‑fresh treat.
- Ingredient Quality: Using unsalted European butter and fine powdered sugar elevates the flavor profile dramatically.
- Method: The chill‑then‑drizzle technique locks in moisture and creates a glossy chocolate finish that looks as good as it tastes.
- Make‑Ahead Potential: These bars keep beautifully in the fridge for up to a week, making them ideal for busy holiday schedules.
Alright, let's break down exactly what goes into this masterpiece...
Inside the Ingredient List
The Flavor Base
Unsalted butter (1 cup, softened): This is the heart of the bar. Butter provides the rich, creamy mouthfeel that defines a classic sugar cookie. If you skip it, you’ll end up with a dry, crumbly mess that won’t hold together. For the best result, choose a European style butter with at least 82% fat; its higher fat content translates to a silkier texture. A quick tip: let the butter sit at room temperature for about 30 minutes so it’s pliable but not melted.
Powdered sugar (1 cup): Powdered sugar sweetens the base without adding grainy texture. It also helps bind the butter and flour together. If you use granulated sugar, the bars will feel gritty and won’t set properly. For a subtle vanilla note, you can substitute half the powdered sugar with confectioners’ icing sugar mixed with a pinch of almond extract.
The Texture Crew
All‑purpose flour (2 cups): The flour gives structure. Too much flour makes the bars dense; too little and they’ll fall apart. I recommend sifting the flour twice to aerate it, which leads to a lighter crumb. If you’re gluten‑sensitive, a 1‑to‑1 substitution with a gluten‑free blend works just as well, though the texture will be slightly more tender.
Salt (½ tsp): A pinch of salt balances the sweetness and enhances the buttery flavor. Skipping salt is a common mistake that leaves the bars tasting flat. Sea salt flakes sprinkled on top just before chilling add a pleasant crunch and a burst of flavor.
The Unexpected Star
Whole‑milk cream (¼ cup): This is the secret weapon that turns an ordinary crumb into a velvety masterpiece. The cream’s fat content coats the flour particles, preventing a dry texture and giving the bars a melt‑in‑your‑mouth quality. If you’re out of cream, substitute with an equal amount of whole milk, but expect a slightly less luxurious mouthfeel.
Vanilla extract (1 tsp): Pure vanilla extract adds depth and a warm, aromatic backdrop. Avoid imitation vanilla; the fake version leaves a chemical aftertaste that clashes with the buttery base. For an extra holiday twist, split the vanilla between the base and the chocolate drizzle.
The Final Flourish
Mini chocolate chips (1 cup, optional): They melt into pockets of gooey chocolate that contrast beautifully with the buttery crust. If you prefer a smoother finish, melt the chips with a splash of cream for a ganache drizzle instead. Skipping the chocolate still yields a delicious bar, but the visual appeal and flavor complexity take a hit.
Crushed peppermint candies (¼ cup, optional): These add a festive crunch and a refreshing mint note that cuts through the richness. If you’re not a fan of peppermint, try finely chopped toasted almonds or dried cranberries for a different texture and flavor profile.
Everything's prepped? Good. Let's get into the real action...
The Method — Step by Step
First, gather a large mixing bowl and whisk together the softened butter and powdered sugar until the mixture is light, fluffy, and pale yellow. This should take about 2‑3 minutes with a handheld mixer on medium speed. You’ll know it’s ready when the mixture looks like a cloud that holds its shape when you lift the whisk. Power transition: This is the moment where the magic begins.
Next, pour in the vanilla extract and whole‑milk cream, then continue mixing until the liquid is fully incorporated. The cream will make the mixture look slightly glossy, and you’ll notice a faint, buttery aroma filling the kitchen.
Kitchen Hack: Add the cream in a slow, steady stream while the mixer is on; this prevents the batter from splitting.In a separate bowl, whisk together the sifted flour and salt. This ensures the salt is evenly distributed and eliminates any lumps that could cause gritty spots. When you’re ready, gradually fold the dry ingredients into the butter‑sugar mixture using a silicone spatula. The key is to fold gently, turning the bowl over and over, until you just see no streaks of flour. Over‑mixing will develop gluten and make the bars tough.
Now, line an 8‑inch square pan with parchment paper, leaving a generous overhang for easy removal later. Transfer the dough to the pan and press it down firmly with the back of a flat measuring cup or your hands, creating an even, compact layer. The surface should be smooth and level; if you see any cracks, press a little more. Watch Out: If the dough is too crumbly to press, microwave the butter for 5 seconds and re‑mix.
Cover the pan with plastic wrap and place it in the refrigerator for at least 30 minutes. This chilling step is crucial; it lets the butter set and the flavors meld, resulting in a firm bar that cuts cleanly. While waiting, preheat a small saucepan over low heat for the chocolate drizzle.
When the base is chilled, melt the mini chocolate chips (or chocolate bar) with a splash of cream in the saucepan, stirring constantly until smooth and glossy. The mixture should be fluid enough to drizzle but not too runny; a good test is to dip a spoon and watch it coat the back without pooling. Remove from heat and let it sit for a minute to thicken slightly.
Using a spoon or a small ladle, drizzle the melted chocolate over the chilled base in a random, artistic pattern. For a professional finish, use a piping bag fitted with a small round tip. If you love a crunchy contrast, sprinkle the crushed peppermint candies over the chocolate while it’s still warm, allowing them to adhere.
Return the pan to the refrigerator for another 15 minutes to let the chocolate set. Once firm, lift the bars out using the parchment overhang and place them on a cutting board. Using a sharp, warm knife, cut the slab into 12 equal squares. The edges should be clean, and the chocolate should snap with a faint crackle.
Plate the bars on a festive platter, dust lightly with powdered sugar for a snow‑kissed look, and serve immediately. If you’re preparing them ahead of time, keep them refrigerated until you’re ready to serve.
Watch Out: Leaving the bars out at room temperature for more than an hour can cause the chocolate to bloom, losing its shine.
That's it — you did it. But hold on, I've got a few more tricks that'll take this to another level...
Insider Tricks for Flawless Results
The Temperature Rule Nobody Follows
Never, ever work with butter straight from the freezer. Cold butter will clump and create pockets of greasiness, while overly soft butter can melt into a soupy mess. The sweet spot is butter that’s softened to the point where you can press a finger into it and leave a faint indentation. If you’re in a rush, cube the butter and let it sit for 10 minutes on the counter; this speeds up the softening without compromising texture.
Why Your Nose Knows Best
When you whisk the butter and sugar, pay attention to the scent. The mixture should transition from a raw, milky smell to a buttery, caramel‑like aroma. If you still smell raw butter, keep mixing a bit longer; the extra aeration helps dissolve the sugar fully, preventing grainy bites later.
The 5‑Minute Rest That Changes Everything
After pressing the dough into the pan, let it rest uncovered for 5 minutes before covering it with plastic wrap. This brief pause allows the surface to dry slightly, which helps the chocolate adhere better later on. Skipping this step often results in a chocolate glaze that slides off, ruining the visual appeal.
Chocolate Tempering Shortcut
If you want that professional snap without a tempering machine, simply melt the chocolate to 115°F, then remove it from heat and stir until it cools to about 88°F before adding the cream. This “seed” method creates stable crystals that give the drizzle a glossy finish and a satisfying snap.
Slice Like a Pro
Use a warm knife for clean cuts. Run the blade under hot water for a few seconds, dry it, and slice. The heat melts the chocolate just enough to glide through without crushing the crumb, resulting in perfect, uniform squares.
Creative Twists and Variations
This recipe is a playground. Here are some of my favorite ways to switch things up:
White Chocolate & Cranberry
Swap the dark chocolate drizzle for melted white chocolate and fold in dried cranberries into the base. The tartness of the cranberries balances the sweet creaminess, making it a perfect holiday appetizer.
Espresso Crunch
Add a tablespoon of finely ground espresso to the flour mixture and drizzle with a dark chocolate ganache infused with a pinch of instant coffee. The subtle coffee bitterness cuts through the buttery richness for an adult‑only version.
Nutty Caramel
Stir in toasted chopped pecans or walnuts into the base, and replace the chocolate drizzle with a thin layer of caramel sauce. The nutty crunch and caramel’s buttery notes elevate the bars to a dessert worthy of a festive feast.
Matcha Green Tea
Incorporate 1 tablespoon of high‑quality matcha powder into the flour for a vibrant green hue and earthy flavor. Pair it with a white chocolate drizzle and a dusting of powdered sugar for a sophisticated, Instagram‑ready treat.
Spiced Pumpkin
Mix a quarter cup of pumpkin puree and a pinch of pumpkin pie spice into the butter‑sugar blend, then top with a drizzle of caramel and a sprinkle of cinnamon. This variation screams autumn but works beautifully for a holiday twist.
Vegan Friendly
Replace butter with a plant‑based margarine, use coconut sugar instead of powdered sugar, and swap chocolate chips for dairy‑free dark chocolate. The result is a cruelty‑free bar that still delivers that buttery melt‑in‑your‑mouth sensation.
Storing and Bringing It Back to Life
Fridge Storage
Place the bars in an airtight container lined with parchment paper. They’ll stay fresh for up to 7 days, retaining their texture and flavor. If the chocolate glaze becomes dull, a quick flash in the fridge for 10 minutes will restore its snap.
Freezer Friendly
Wrap each bar individually in plastic wrap, then place them in a zip‑top freezer bag. They freeze beautifully for up to 2 months. To thaw, transfer them to the refrigerator overnight; the bars will regain their original consistency without any sogginess.
Best Reheating Method
When you’re ready to serve, let the bar sit at room temperature for 10 minutes, then microwave for 5‑7 seconds. Add a tiny splash of milk or cream before microwaving; the steam revives the crumb, making it as soft as the day it was made.