I was standing in my kitchen on a rainy Tuesday night, staring at a half‑finished cheesesteak that looked more like a soggy mess than the iconic Philly legend I craved. My roommate had dared me to reinvent the classic in a bowl, and I thought, “Why not?” The moment I tossed the first spoonful of ground beef into a hot pan, the kitchen filled with a sizzle that sounded like applause. The air turned buttery and sweet, tinged with the faint perfume of caramelized onions, and I knew I was on the brink of something unforgettable.
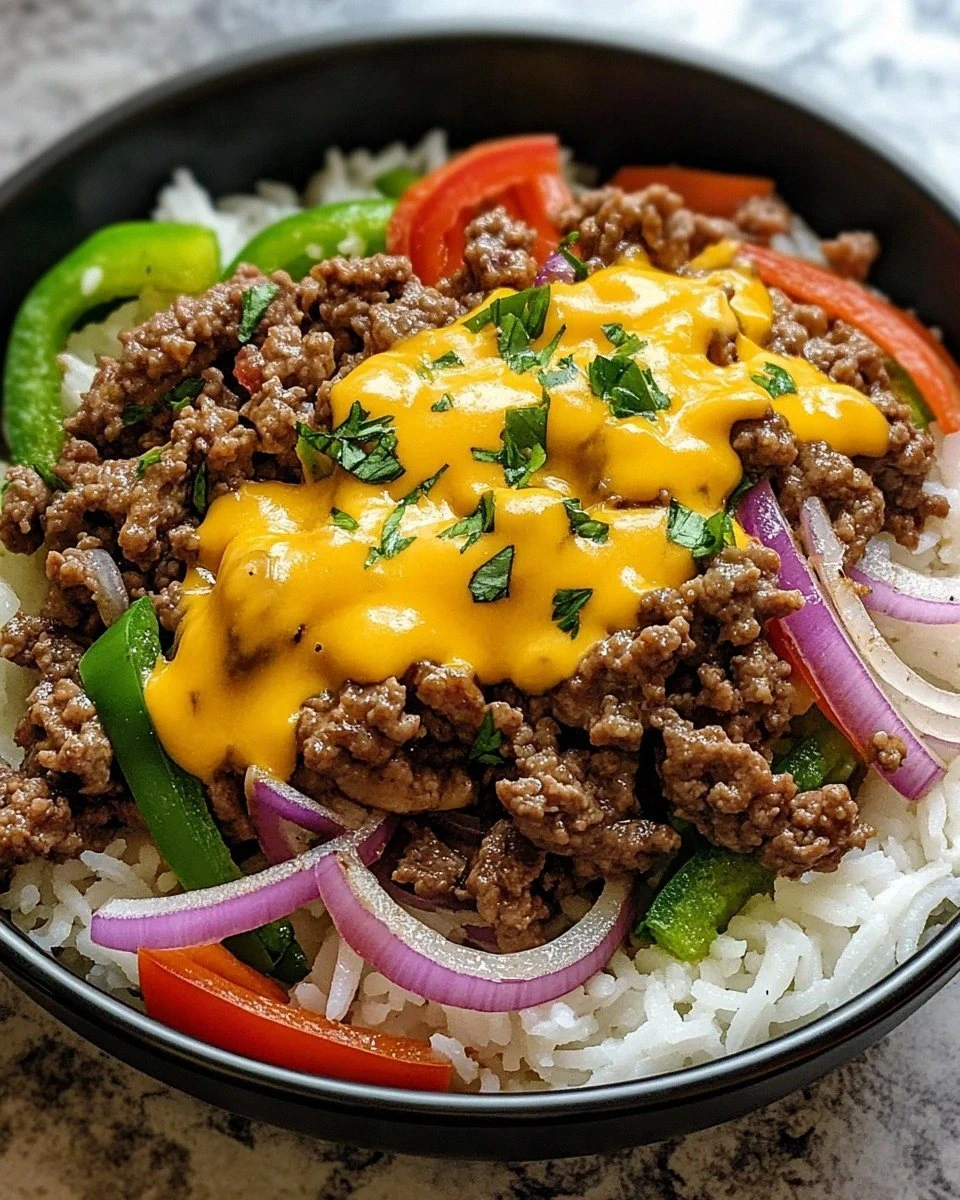
Fast forward a few minutes, and I was juggling diced red onion, green and red bell peppers, and a splash of half‑and‑half that turned the pan into a glossy, creamy stage. The cheese sauce began to thicken, hugging each morsel like a warm blanket. When I finally spooned that velvety, cheesy concoction over a bed of fluffy white rice, the bowl glistened like a sunrise over the Delaware River. The first bite was a revelation – the beef was juicy, the peppers crisp, the sauce buttery yet tangy, and the rice soaked up every drop of flavor without getting mushy.
Most recipes out there try to shoe‑horn the cheesesteak into a sandwich, missing the magic of a bowl that lets every component shine. This version flips the script: we keep the classic taste but give it a hearty, grain‑based foundation that makes it a complete meal, perfect for any night you’re craving comfort without the bun. I’ll be honest — I ate half the batch before anyone else got a chance to try it, and I’m still not over it. I dare you to taste this and not go back for seconds; the bowl is practically begging for a second scoop.
What truly sets this bowl apart is a secret technique I discovered while watching a street vendor in South Philly: a quick roux made with butter and flour that creates a cheese sauce smoother than a jazz sax solo. I’ll walk you through every single step — by the end, you’ll wonder how you ever made a cheesesteak any other way.
What Makes This Version Stand Out
- Flavor Explosion: The combination of ground beef, caramelized onions, and a mustard‑infused cheese sauce hits every taste bud, delivering that authentic Philly tang with a creamy twist.
- Texture Harmony: Crunchy bell peppers contrast with the silky rice and melt‑in‑your‑mouth cheese, creating a multi‑layered mouthfeel that keeps you reaching for more.
- Simplicity Meets Sophistication: Only ten core ingredients, yet each one is treated with a technique that elevates the whole dish without overwhelming you.
- Unique Sauce Base: A butter‑flour roux mixed with half‑and‑half and mustard gives the cheese sauce a depth you won’t find in standard stovetop melts.
- Crowd‑Pleaser: Whether you’re feeding a family of four or a group of friends, the bowl’s bold flavors spark conversation and empty plates fast.
- Ingredient Quality: Using lean ground beef and real white cheddar ensures you get a rich, satisfying taste without excess grease.
- One‑Pan Efficiency: Most of the cooking happens in a single skillet, meaning less cleanup and more time to enjoy the results.
- Make‑Ahead Friendly: Cook the rice and sauce ahead of time, then assemble the bowl in minutes – perfect for busy weeknights.
Inside the Ingredient List
The Flavor Base
Lean Ground Beef: The star! It provides the savory heartiness that’s essential for that classic cheesesteak flavor. Choose a 90 % lean grind to keep the meat juicy without excess grease. If you skip it, you lose the meaty backbone and the bowl becomes a cheesy veggie medley, which, while tasty, isn’t the iconic Philly experience.
Red Onion: This adds a sweet and tangy crunch that complements the savory beef beautifully. Slice it thin so it caramelizes quickly, releasing sugars that deepen the overall flavor. In a pinch, yellow onion works, but you’ll miss that subtle bite.
The Texture Crew
Green Bell Pepper & Red Bell Pepper: Their mild, slightly grassy flavor brings freshness to each bite, while the red pepper adds a natural sweetness that balances the spices. Dice them uniformly for even cooking; uneven pieces will either burn or stay raw, ruining the texture harmony.
Cooked White Rice: Fluffy rice forms the base of the dish, ready to soak up all that delicious cheesy goodness. Use day‑old rice for the best texture – it’s drier and won’t turn mushy when mixed with the sauce. If you’re gluten‑free, jasmine or basmati work just as well.
The Unexpected Star
Half‑and‑Half: This creamy dairy product forms the base of the cheese sauce, lending it a silky texture that milk alone can’t achieve. It also tempers the cheese’s sharpness, creating a balanced richness. For a lighter version, substitute with low‑fat milk, but expect a thinner sauce.
Shredded White Cheddar Cheese: For that gooey, melty goodness that blankets the entire dish beautifully. Opt for a sharp cheddar if you love a punchier flavor; mild cheddar yields a smoother, milder melt. Skipping the cheese is not an option unless you’re aiming for a “cheeseless” bowl, which defeats the purpose.
The Final Flourish
All‑Purpose Flour: Used to thicken the cheese sauce and give it that desirable consistency. A quick whisk into the melted butter creates a roux that prevents the sauce from separating. If you’re avoiding gluten, cornstarch can substitute, but the texture will be slightly different.
Garlic & Ground Mustard: Minced garlic adds a punch of flavor that elevates the sauce from ordinary to extraordinary, while a dash of mustard adds depth and a subtle heat. Both are essential; omitting them makes the sauce flat and one‑dimensional.
Salt and Black Pepper, Kosher Salt, Black Pepper: Essential for seasoning, a little goes a long way in enhancing the flavors of the beef and veggies. Kosher salt provides a clean finish, while freshly cracked black pepper adds a gentle warmth. Taste as you go – the sauce should be seasoned but not salty.
Everything's prepped? Good. Let's get into the real action…
The Method — Step by Step
Heat a large cast‑iron skillet over medium‑high heat and melt the butter. Once it foams, sprinkle in the flour and whisk continuously for about 2 minutes, watching the mixture turn a light golden color. This is the roux, and it’s the foundation of your sauce – if it burns, the whole bowl suffers. Power transition: Okay, ready for the game‑changer?
Add the minced garlic and ground mustard to the roux, stirring for another 30 seconds until fragrant. You’ll hear a subtle sizzle that signals the aromatics are waking up.
Kitchen Hack: Use a garlic press for a finer mince; this releases more flavor and prevents bitter chunks.Slowly pour in the half‑and‑half, whisking constantly to avoid lumps. The sauce will begin to thicken within a minute, turning a creamy ivory hue. Reduce the heat to low and let it simmer gently while you prep the veggies. Watch Out: If the sauce starts to boil, it can separate – keep it at a gentle simmer.
Meanwhile, increase the skillet’s heat to medium‑high and add the lean ground beef, breaking it up with a wooden spoon. Season immediately with the “Salt and Black Pepper” blend, letting the meat brown beautifully. You’ll hear that satisfying sizzle that means the Maillard reaction is in full swing, creating those coveted caramelized edges.
When the beef is about 80 % cooked, toss in the diced red onion, green bell pepper, and red bell pepper. Stir constantly, allowing the veggies to soften but retain a slight crunch – think of a bite that’s tender yet still whispers of its original snap. The colors should meld into a vibrant, glossy medley.
Now, fold the shredded white cheddar into the simmering sauce, letting it melt slowly. The cheese should melt like silk, coating the pan in a glossy sheen that clings to every piece of beef and pepper. Sprinkle the kosher salt and fresh black pepper, tasting and adjusting as needed.
Watch Out: Over‑stirring at this stage can cause the cheese to become grainy; fold gently.While the sauce reaches its final thickness (it should coat the back of a spoon), heat the cooked white rice in a separate pot or microwave. Fluff it with a fork so each grain stays separate – this prevents the bowl from turning into a soggy mush.
To assemble, scoop a generous mound of rice into each bowl, then ladle the beef‑and‑cheese mixture over the top. The sauce should cascade down the sides, creating a glossy river of flavor. Finish with a final drizzle of melted cheese if you like extra indulgence.
Serve immediately, letting the steam rise and fill the room. Picture yourself pulling this out of the skillet, the whole kitchen smelling incredible, and the first bite melting in your mouth. This next part? Pure magic.
That’s it — you did it. But hold on, I’ve got a few more tricks that’ll take this to another level…
Insider Tricks for Flawless Results
The Temperature Rule Nobody Follows
Keep the heat on medium‑high when browning the beef, but drop to medium‑low for the sauce. High heat creates a crust on the meat, while low heat prevents the cheese from scorching. A friend once tried to keep everything on high and ended up with a burnt, bitter sauce – lesson learned.
Why Your Nose Knows Best
Trust the aroma cues: when the onions turn translucent and start to caramelize, you’re at the sweet spot. If you hear a sharp hiss, the pan is too hot; lower it immediately. Your nose is a built‑in timer that tells you when flavors are developing.
The 5‑Minute Rest That Changes Everything
After the sauce reaches the perfect thickness, remove the pan from heat and let it rest for five minutes. This allows the cheese fibers to relax and the sauce to become even silkier. Skipping this step results in a sauce that feels a bit “tight” on the palate.
The Rice Flip Technique
When reheating leftover rice, flip the container upside down for 30 seconds in the microwave. This creates a fluffy top layer and prevents sogginess. I tried the traditional stir‑and‑heat method once and ended up with clumps – the flip is a game‑changer.
Seasoning Layers, Not Just One
Season the beef, the sauce, and the final bowl separately. Each layer builds depth, ensuring no bite feels flat. I once seasoned only the beef and found the final bowl bland; adding a pinch of salt to the sauce made all the difference.
Creative Twists and Variations
This recipe is a playground. Here are some of my favorite ways to switch things up:
Spicy Jalapeño Kick
Add sliced jalapeños or a dash of hot sauce to the sauce for a fiery bite. The heat pairs beautifully with the creamy cheese, giving the bowl a bold edge that will please pepper lovers.
Smoky Bacon Boost
Crisp up a handful of bacon bits and stir them in with the beef. The smoky crunch adds depth and transforms the bowl into a decadent indulgence that feels like brunch any time.
Mushroom Medley
Swap half the beef for sliced cremini or portobello mushrooms. The earthy umami complements the cheese sauce and makes the dish a bit lighter without losing heartiness.
Mediterranean Spin
Replace the white cheddar with feta and sprinkle olives and sun‑dried tomatoes on top. The tangy feta and briny olives give a Mediterranean twist while keeping the creamy base.
Vegan Version
Use plant‑based ground “beef,” dairy‑free butter, oat‑based half‑and‑half, and a vegan cheddar shreds. The technique stays the same, and the result is just as satisfying for anyone avoiding animal products.
Storing and Bringing It Back to Life
Fridge Storage
Place the rice and sauce in separate airtight containers. The sauce will keep for up to 3 days, and the rice for 4 days. When ready to eat, reheat the sauce gently on the stove, adding a splash of water to revive its silkiness.
Freezer Friendly
Cool the beef‑and‑cheese mixture completely, then portion into freezer‑safe bags. It freezes well for up to 2 months. Thaw overnight in the fridge, then reheat on low heat, stirring in a tablespoon of half‑and‑half to bring back the creaminess.
Best Reheating Method
Microwave the sauce in 30‑second bursts, stirring between each, until bubbling. Add a tiny splash of water or extra half‑and‑half before heating; the steam will bring the sauce back to its original velvety texture. Serve over freshly reheated rice for a bowl that tastes just‑right.