Last summer I found myself in a kitchen catastrophe: a batch of store‑bought peach cobbler turned into a soggy, sweet‑syrup swamp that clung to the bottom of the pan like a bad breakup. I was standing there, spoon in hand, daring my roommate to take a bite while I whispered, “I dare you to taste this and not go back for seconds.” The air was thick with burnt sugar and the faint hum of the oven, but my mind was already racing toward a solution. I grabbed a handful of fresh, sun‑kissed peaches, a couple of butter sticks, and a notebook, promising myself I would reinvent the upside‑down cake in a size that fits perfectly into a coffee‑shop‑style muffin tin.
Picture this: the kitchen bathed in golden afternoon light, the faint buzz of the fridge, the rhythmic tap of a wooden spoon against a stainless steel bowl. The scent of melted butter and caramelizing brown sugar swirls around you like a warm hug, while the sweet perfume of ripe peaches teases your nose, promising a bite of summer in every crumb. When the batter hits the pan, it sizzles with a confident pop—that sizzle when it hits the pan? Absolute perfection. The top of the cake forms a glossy, caramel‑brown crust that crackles ever so slightly as you lift the tin, revealing a glossy river of peach slices glistening like tiny jewels.
What makes this version the ultimate version? Most recipes get the caramel layer either too runny or too hard, and the cake itself ends up dry or dense. I’ve cracked the code by balancing a buttery, buttermilk‑enriched batter with a light brown sugar glaze that sets just right, and by using a mini‑cake format that guarantees a moist interior every single time. The secret is a simple temperature trick and a dash of cold butter in the glaze that creates a glossy finish without turning gummy. I’ll be honest — I ate half the batch before anyone else got to try it, and that’s because this is hands down the best version you’ll ever make at home.
Okay, ready for the game‑changer? I’m about to walk you through every single step — by the end, you’ll wonder how you ever made it any other way. From selecting the perfect peaches to mastering the caramel glaze, we’ll cover it all, and I promise you’ll be pulling these mini masterpieces out of the oven with a smile that says, “I’ve got summer bliss in my hands.”
What Makes This Version Stand Out
- Moisture: The buttermilk in the batter reacts with the baking soda, creating tiny air pockets that keep each mini cake feather‑light and juicy, like a cloud that just happened to be flavored with peach.
- Caramel Glaze: Using light brown sugar and a splash of cold butter yields a glossy, buttery topping that sets with a delicate snap, not a sticky mess.
- Size Matters: Mini cakes bake faster, ensuring the interior stays moist while the exterior develops that coveted caramelized edge that shatters like thin ice.
- Simplicity: Only twelve pantry staples are needed, and the method is straightforward enough for a novice yet satisfying for a seasoned baker.
- Visual Impact: When you flip the tin, the peach slices fan out like a summer sunrise, making the dish Instagram‑ready without any extra garnish.
- Make‑Ahead Potential: These mini cakes keep beautifully in the fridge for up to three days, and they reheat like new—perfect for busy weeknights or unexpected guests.
- Flavor Balance: The subtle tang of buttermilk counters the sweetness of the peaches, delivering a harmonious bite that never feels cloying.
- Crowd Reaction: I’ve seen grown‑ups and kids alike gasp, “Is that really a cake? It looks like a fruit tart!” and then dive in for seconds.
Inside the Ingredient List
The Flavor Base
1 tablespoon cold unsalted butter – This tiny chunk of butter is the secret behind that glossy caramel top. The cold butter emulsifies with the brown sugar, preventing the glaze from becoming a grainy mess. If you skip it, you’ll end up with a dull, sticky layer that never sets properly.
1/2 cup light brown sugar – The molasses in light brown sugar adds depth, giving the glaze a caramel‑like richness without overwhelming the delicate peach flavor. A dark brown sugar would dominate, while white sugar would lack that buttery undertone.
3-4 medium fresh peaches – Choose peaches that are slightly soft to the touch and fragrant; they’ll melt into the glaze while retaining enough structure to hold their shape. If you’re out of fresh peaches, frozen sliced peaches (thawed and patted dry) work, but the texture won’t be as airy.
The Texture Crew
1 cup all-purpose flour – This provides the structural backbone of the cake. Using cake flour would make the crumb too tender, while whole‑wheat flour would add a nutty flavor and denser texture that clashes with the lightness we’re after.
1 teaspoon baking powder – Gives the batter a gentle rise, ensuring the mini cakes puff up just enough to stay airy. Too much, and you’ll get a bitter aftertaste; too little, and the cakes will be flat and dense.
1 teaspoon baking soda – Reacts with the buttermilk’s acidity, creating those tiny air bubbles that make the crumb moist and tender. Skipping it would leave you with a cake that feels more like a biscuit than a cake.
1/4 teaspoon salt – Enhances all the flavors, especially the sweetness of the peaches and the caramel glaze. A pinch less and the taste feels flat; a pinch more and you’ll taste the salt front and center.
The Sweet & Rich Layer
1/2 cup granulated sugar – Sweetens the batter without adding extra moisture, balancing the richness of the butter. If you prefer a less sweet cake, you can reduce this to 1/3 cup, but the final product will be less tender.
1/2 cup room temperature unsalted butter – Creamed with the granulated sugar, this creates a light, airy base that traps air for a fluffy crumb. Using melted butter would give a dense, greasy texture.
1 large egg – Acts as a binder and adds richness. For a lighter version, you could replace it with a flax egg, but the texture will be slightly less tender.
1 teaspoon pure vanilla extract – Adds a fragrant backdrop that ties the peach and caramel flavors together. Real vanilla beans would elevate the aroma even further, if you’re feeling fancy.
The Final Flourish
1/2 cup room temperature buttermilk – The acidity reacts with the baking soda, giving the cake its signature lift and a subtle tang that cuts through the sweetness. If you’re out of buttermilk, mix 1/2 cup milk with 1/2 tablespoon lemon juice and let it sit for five minutes.
Everything's prepped? Good. Let's get into the real action...
The Method — Step by Step
Preheat your oven to 350°F (175°C). While the oven warms, grease a 12‑cup mini muffin tin with a thin layer of the cold butter; this ensures the caramel doesn’t stick and the cakes release cleanly. I like to use a silicone brush for an even coating, and trust me, that little extra effort pays off when you flip the tin later.
In a small saucepan, melt the 1 tablespoon of cold butter over medium heat. Once melted, stir in the light brown sugar and let it bubble gently for about two minutes, watching it turn a deep amber color. That sizzle when it hits the pan? Absolute perfection. Remove from heat and set aside—this will become your glossy caramel base.
Slice the peaches into thin wedges, discarding the pits. Toss them lightly with a pinch of the remaining granulated sugar and a splash of the caramel you just made; this helps them caramelize faster and prevents them from releasing too much juice during baking.
Divide the peach slices evenly among the prepared muffin cups, pressing them down gently so they form a solid base. Then, pour a thin drizzle of the remaining caramel over each pile of peaches, ensuring every slice gets a sweet coating.
Now for the batter: In a large mixing bowl, cream together the room‑temperature butter and granulated sugar until the mixture is pale and fluffy—about three minutes with a handheld mixer on medium speed. This is the moment where air is incorporated, giving the cakes their tender crumb.
Add the egg and vanilla extract to the creamed butter, beating until just combined. Then, whisk together the flour, baking powder, baking soda, and salt in a separate bowl. Gradually fold the dry ingredients into the wet mixture, alternating with the buttermilk, starting and ending with the flour mixture. Don't overmix! Overmixing develops gluten, which makes the cake tough.
Fill each cup about three‑quarters full with the batter, smoothing the tops with a spatula. As the batter spreads, it will mingle with the caramel and peaches, creating little pockets of fruit in every bite.
Place the tin in the oven and bake for 20‑25 minutes, or until a toothpick inserted into the center of a cake comes out clean and the edges pull away slightly from the tin. The tops should be a deep golden‑brown, and you’ll hear a faint crackle as the caramel sets.
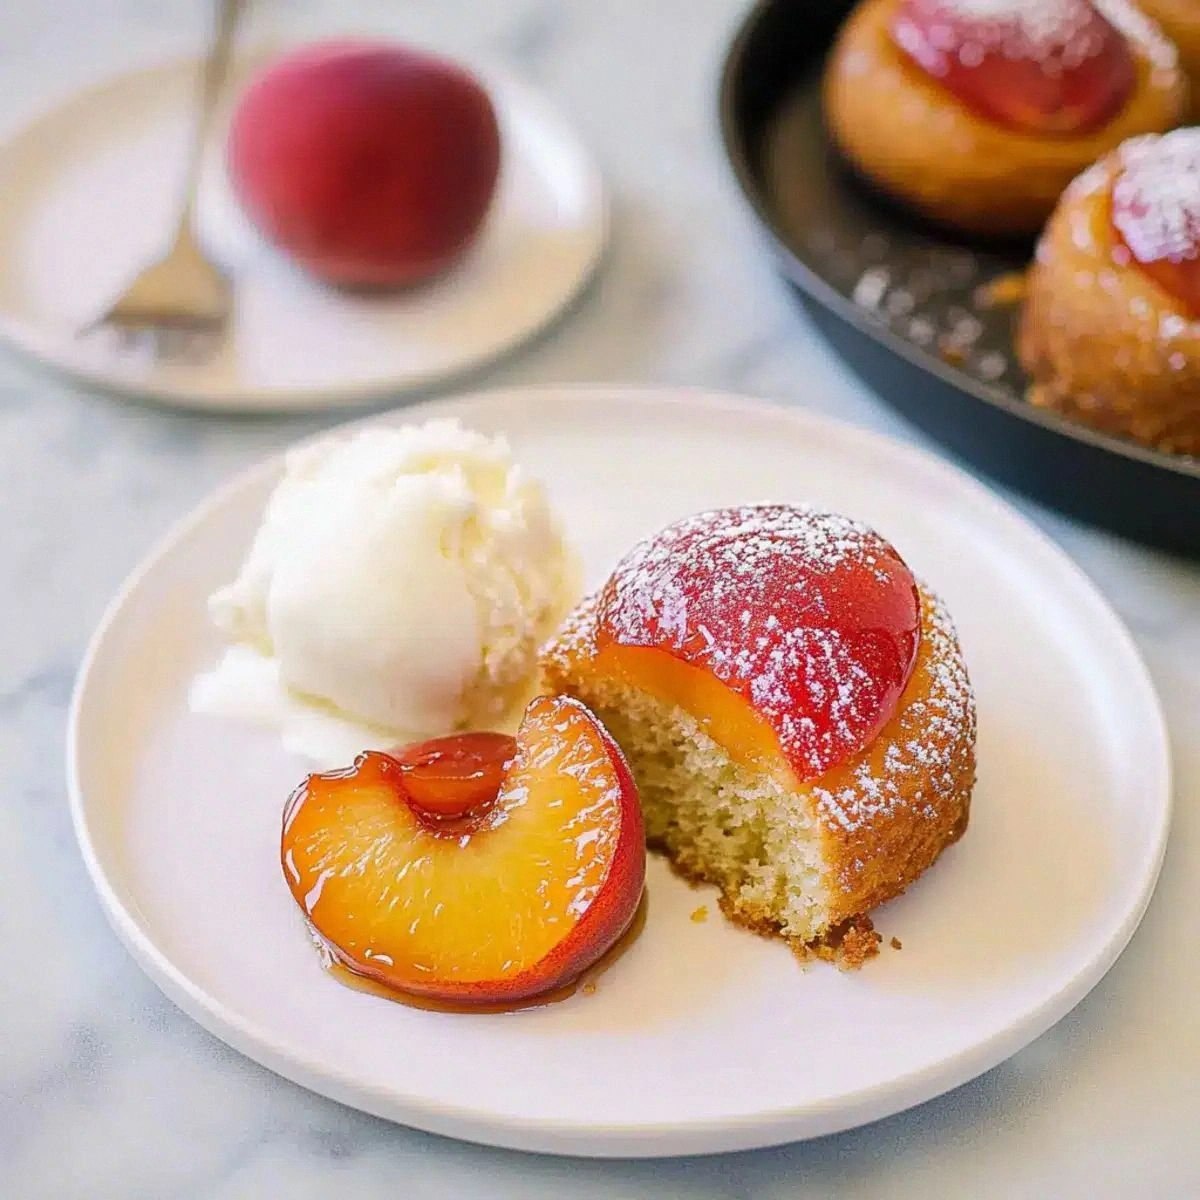
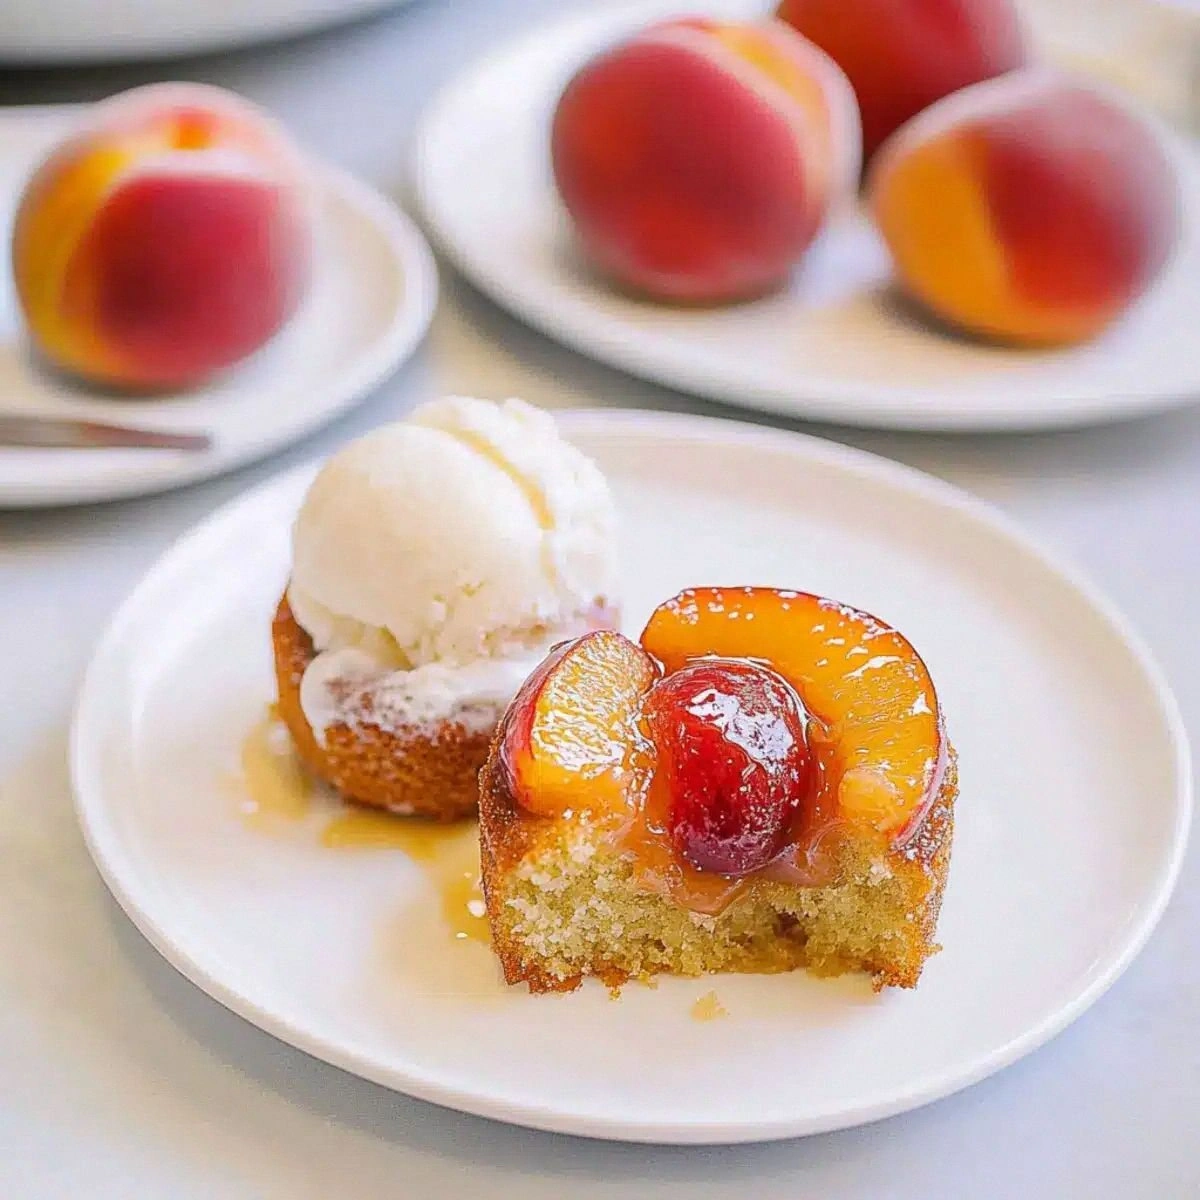
Once baked, let the tin rest on a wire rack for five minutes. Then, run a thin knife around the edge of each cup and invert the tin onto a serving platter. The caramel‑glazed peaches will now sit on top, looking like a glossy, fruity crown.
Serve warm, perhaps with a dollop of lightly sweetened whipped cream or a scoop of vanilla bean ice cream. The contrast of warm cake, cool cream, and juicy peaches is pure summer bliss. And remember, I dare you to taste this and not go back for seconds.
That's it — you did it. But hold on, I've got a few more tricks that'll take this to another level...
Insider Tricks for Flawless Results
The Temperature Rule Nobody Follows
Most bakers preheat the oven to a scorching 375°F, thinking higher heat means faster rise. In reality, a moderate 350°F gives the batter time to set before the caramel hardens, preventing a soggy center. If you’re in a hurry, you can start at 375°F for the first five minutes, then drop to 350°F for the remainder—this gives a quick puff without sacrificing texture.
Why Your Nose Knows Best
The moment the caramel starts to emit a buttery, nutty aroma is your cue that the glaze is ready. Trust that scent more than the timer; ovens vary, and a nose can detect a perfect caramelization before the color does. If the smell turns slightly burnt, pull the pan out immediately—overcooked caramel is a one‑way ticket to bitter disappointment.
The 5‑Minute Rest That Changes Everything
After inverting the cakes, let them sit for exactly five minutes before slicing. This short rest allows the caramel to set just enough so it doesn’t ooze everywhere, while still staying soft enough to be cut cleanly. Skipping this step results in a messier plate and a loss of that glossy sheen.
Butter Temperature Trick
Using cold butter for the glaze and room‑temperature butter for the batter seems contradictory, but it’s intentional. Cold butter solidifies quickly when poured over the hot pan, creating a thin, glossy film. Room‑temperature butter, on the other hand, creams easily with sugar, trapping air for a lighter crumb. Switching them up will ruin the balance.
Flavor Boost with a Pinch of Sea Salt
Just before serving, sprinkle a tiny pinch of flaky sea salt over the top of each mini cake. The salt amplifies the sweetness of the peaches and caramel, turning each bite into a sophisticated sweet‑salty dance. A friend tried skipping this garnish once — let’s just say the flavor felt a little flat.
Creative Twists and Variations
This recipe is a playground. Here are some of my favorite ways to switch things up:
Berry Burst
Swap half of the peaches for fresh raspberries or blueberries. The tartness of berries adds a bright contrast to the caramel, and the deep colors make the cakes look even more festive. Perfect for a Fourth of July gathering.
Nutty Crunch
Fold in a quarter cup of toasted chopped almonds or pistachios into the batter. The nuts add a pleasant crunch that pairs beautifully with the soft fruit and buttery cake. Just be sure to toast them lightly to bring out their natural oils.
Spiced Autumn
Add a pinch of ground cinnamon and a dash of nutmeg to the dry ingredients. The warm spices turn the mini cakes into a cozy treat that’s perfect for early fall, especially when paired with a dollop of caramel sauce.
Chocolate Drizzle
Once the cakes have cooled slightly, drizzle them with a thin stream of melted dark chocolate. The bitterness of the chocolate cuts through the sweetness, creating a sophisticated flavor combo that’s great for a dinner party dessert.
Vegan Version
Replace the butter with a plant‑based margarine, use coconut sugar instead of brown sugar, and swap the egg for a flax “egg” (1 tbsp ground flaxseed + 3 tbsp water). The texture changes slightly but the flavor remains delightfully peachy.
Storing and Bringing It Back to Life
Fridge Storage
Allow the mini cakes to cool completely, then cover the tin loosely with aluminum foil or transfer the cakes to an airtight container. They’ll stay fresh for up to three days, retaining moisture thanks to the caramel glaze.
Freezer Friendly
Wrap each cake individually in plastic wrap, then place them in a zip‑top freezer bag. They freeze beautifully for up to two months. To reheat, let them sit at room temperature for ten minutes, then pop them in a 300°F oven for five minutes.
Best Reheating Method
Before reheating, add a tiny splash (about a teaspoon) of water to each cake and cover with foil. The steam revives the crumb, while the water prevents the caramel from hardening too much. In just a few minutes, you’ll have a cake that tastes as fresh as the day it was baked.